Bluehost Web Hosting Help
What Is The SSL Trust Error In Email Apps? Email Security SSL Verification
Summary
An SSL Certificate is a file issued by a trusted third party that verifies you have connected to a legitimate server and not an imposter trying to steal your data. When an SSL connection is made with a server, the server provides the certificate to the computer connecting to it. The computer then analyzes the certificate to verify the identity of the server.
All SSL certificates eventually expire and must be reissued. When this happens, your computer or email application may not recognize the new one. In some cases, you'll be prompted to approve the certificate manually or cancel the connection; in others, it simply won't connect.
Each email application handles this a bit differently, so we'll show you how to accept the new SSL in your application.
- Verify the Certificate in Mac Mail
- Trust the Certificate in iOS
- Reinstall the Certificate in Outlook
Verify the Certificate in Mac Mail
"The identity of "mail.example.com" cannot be verified." If you're receiving this or a similar error in Mac Mail, follow these steps:
- When you get the error message click Show Certificate
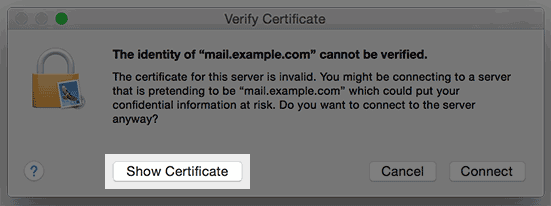
The show image button. - Check the box to always trust the certificate.
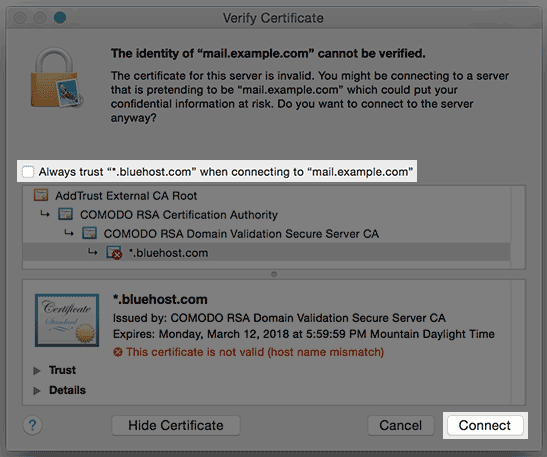
The always trust option. - Click Connect.
Trust the Certificate in iOS
"Cannot Verify Server Identity. The identity of "mail.example.com" cannot be verified by Mail. Review the certificate details to continue" If you're receiving this or a similar error on your iOS device, follow these steps:
- When you get the error message, tap Details.
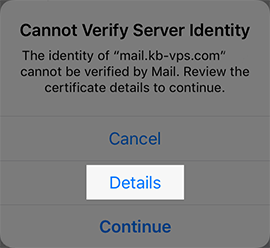
- Tap Trust in the top right corner.
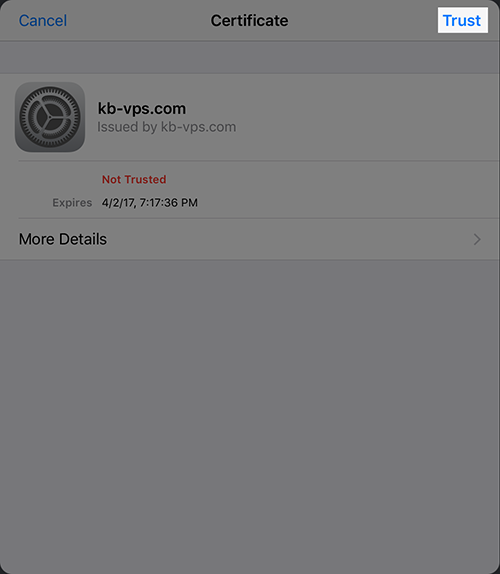
- Change Host Name from mail.domain.com to box###.Bluehost.com (If Host Name is already the box###, change to mail.domain.com)
- Log in to your cPanel.
- Click email at the top of the screen.
- Click email configuration from the menu on the left.
- Select one of your email accounts from the drop down menu. The box### will be listed under Private with SSL settings on the incoming and outgoing mail server.
- Navigate to Settings, then select Accounts and Passwords.
- Select your email account.
- Select SMTP (Outgoing Mail Server).
- Select Primary Server.
- Toggle Use SSL off, and change the Server Port to 26.
- Press Done in the upper right corner.
- Double click the Home button and swipe up. This will close your email client.
- Refer to steps 1 through 4 above to navigate to your Outgoing Server settings.
- Toggle the Use SSL option on.
- Press Done in the upper right corner.
- Navigate to Settings, then select Accounts and Passwords.
- Select your email account.
- Select SMTP (Outgoing Mail Server).
- Select Add Server...
- Enter the host name. This is mail.yourdomain.com (substitute ‘yourdomain.com’ with your actual domain name).
- Enter the username (your full email address)
- Enter the password (for the email address in question)
- Press Done in the upper right corner.
- Once verified, you will be brought back to the SMTP Server page. Select the Primary Server.
- Toggle the Primary Server off, then press Done in the upper right corner. This will force the newly added server to take over mail handling.
If Steps 1 and 2 do not resolve the issue, proceed to Step 3.
You can locate the box### from your email settings. To navigate there, follow these steps:
If the Trust Button is missing or greyed out, continue to the steps below:
Option 1: Turn off SSL, change to Port 26, and verify email can be sent.
Option 2: Add the SMTP Server back in as new.
Reinstall the Certificate in Outlook
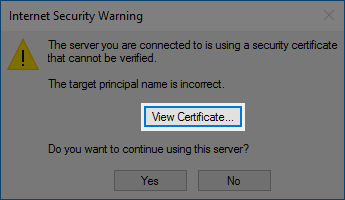
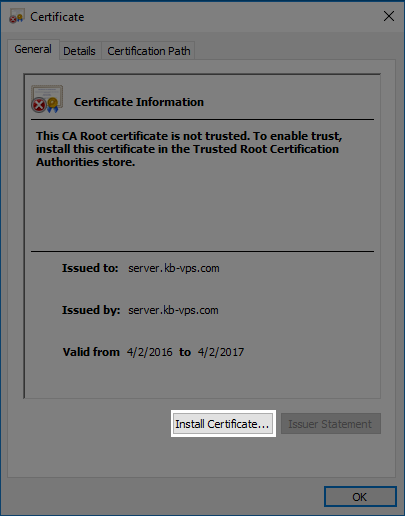
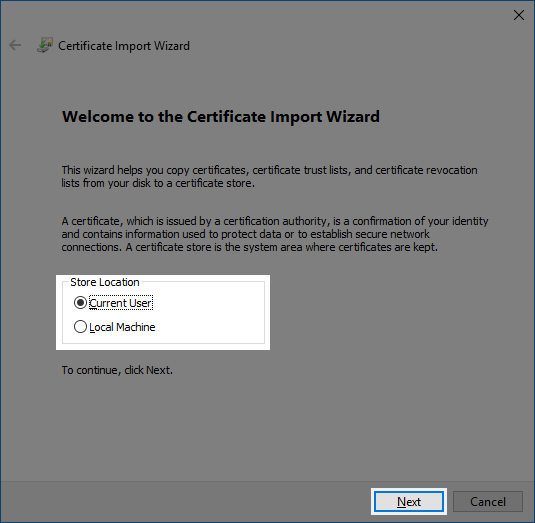
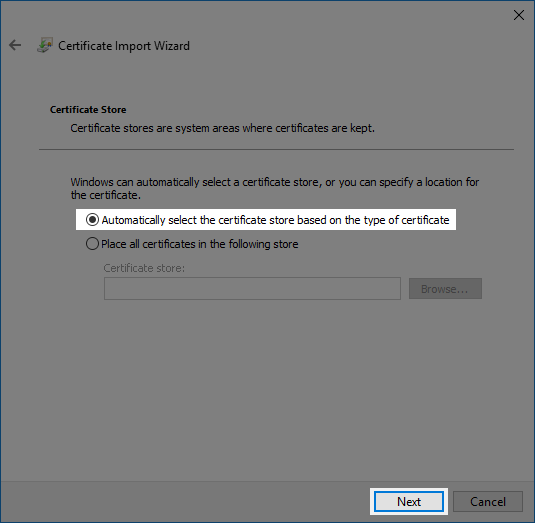
If you are connecting to Bluehost with Outlook and getting the SSL error follow, these steps to make your computer trust the certificate.
- Click the View Certificate button.
- Click Install Certificate
- Next you will see the import wizard. Leave current user selected and click next.
- Choose "Automatically select the certificate store based on the type of certificate"
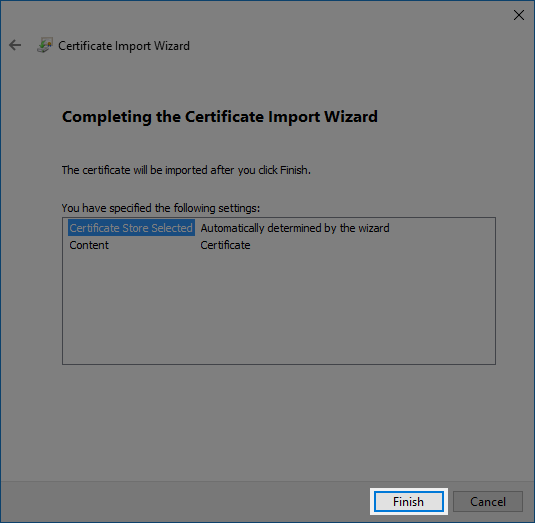
- Click Finish.
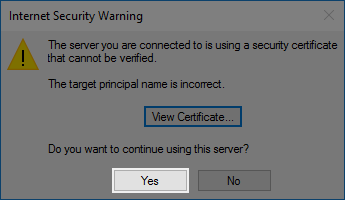
- Click Yes to continue connecting.
Recommended Help Content
Purchasing or Renewing SSL certificates
How to renew an existing SSL certificate--or purchase a new one, within your cPanel
Email Error Messages - What Do They Mean?
Look for the error message that most closely matches the one you received.
Office 365: Setting up Office Apps
How to download office apps for desktop use
Related Help Content
How To Import Mail into G Suite (formerly Google Apps)
This article will explain how to import email from your Bluehost email accounts to a G Suite (formerly Google Apps) account.
What Is AutoSSL? How Does AutoSSL Work?
AutoSSL is a free certificate that is provided to customers for website security.
How To Activate Free SSL Certificate - Free Wordpress SSL Setup
Bluehost now provides free free SSL certificates for all WordPress sites. This article describes how to activate the free SSL for a WordPress site.
How to Upload an SSL Certificate to SiteLock
This article will explain the process for uploading an SSL Certificate to SiteLock's dasboard. The steps for accessing the SSL Manager may vary depending on which user interface your account uses.
What Is G Suite? How To Use Google Suite Products
How to increase your productivity with G Suite (formerly Google Apps for Work)
Email not sending from Client or Webmail
Trying to send out emails from multiple email accounts fail from both webmail and third party email clients. Possible Reasons: The maximum emails per hour has been exceeded. This can be caused by forw
How To Check Email - Webmail & Email Applications
So, you want to access your email, eh? You're going to need an email client for that. But what is an email client? Email clients come in two varieties: webmail and email applications.
Verification
How do I verify my new account?


 271,481 views
 bookmark
 share
share
 E-mail
 Twitter
 Google Bookmarks
 Facebook
 MySpace
 Digg
Digg Reddit
 Delicious
 LinkedIn
 StumbleUpon
 tags:
tags: