HostMonster Web Hosting Help
How To Migrate a WordPress Site - Import / Export WordPress Database
Summary
This article will explain how to migrate your WordPress site without using Marketplace.
- Transfer Your Files
- Export the WordPress Database
- Create a New Database
- Import into New Database
- Update the WordPress Configuration File
- Fixing your Permalinks
Transfer your Files
- Connect to your current hosting account using FTP
Note: If you are unsure how to connect using FTP please see our article Filezilla which explains how to setup Filezilla, a popular FTP program. - Locate the directory that contains your WordPress site Files. This could be your public_html or a subfolder inside of the public_html
Note: Typically you will need all of the files and folders beginning with "wp-". - Using your FTP client, download these files to your computer
- Now you need to upload those files to your new hosting account. You can use FTP to upload these files.
- Navigate to your public_html folder or the subfolder where you want WordPress installed
- Upload the files from your computer to this new location
Export the WordPress Database
- On your current hosting account, open the wp-config.php file. Located in this file is the name of the database that you need to export
- Most cPanel based hosting accounts should provide a copy of PHPMyAdmin to access your database. You can use this to export the database as a .sql file.

Note: If you don't have access to PHPMyAdmin, you can use a plugin to export a backup of your database
Create a New Database
You are now going to create a new database for the WordPress install.
- In your cPanel: Navigate to the Database category and click MySQL Databases
- Create a new database by typing in a name for it. This will be something like username_wp1, with 'wp1' being the name given to the database.

- Now create a user for the database. You will provide a password for the user, which is important to remember for a later step in configuring WordPress
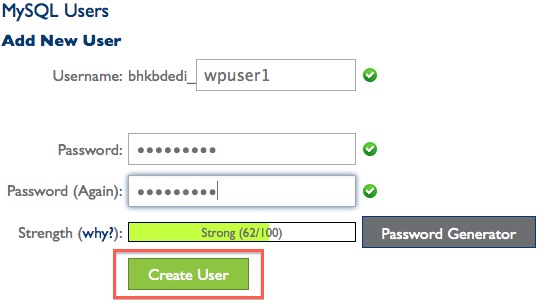
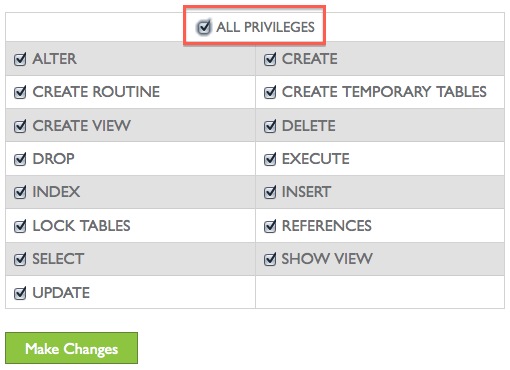
- Once you have created the user, you will need to assign it to the database. When you do this, give the user All Privileges
Import into New Database
Now that you have a database created, you are going to Import the .sql file you downloaded into it
- In your cPanel: Navigate to the database category and click PHPMyAdmin
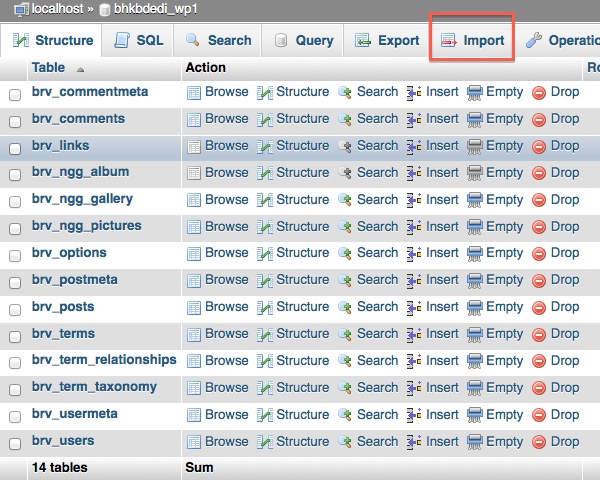
- Choose your newly created database, from the left hand side of the page.

- Along the top of the screen, click the Import tab
- Click the Browse button, and locate the file on your computer.
- Once you select the file, click Go to start the import.
Update your WordPress Configuration File
Now you need to make sure that your WordPress install is connected to the correct database. To do this,
- Open your File Manager and edit the wp-config.php file

- You will need to type in the new database information: database name, database user, and the password.
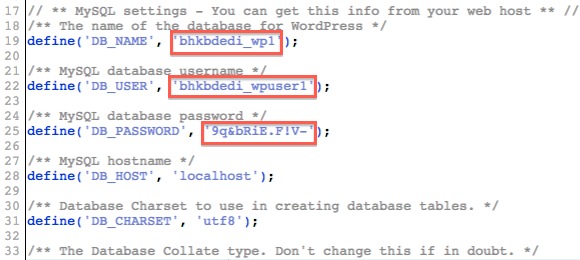
- Once you have updated those, click Save Changes
Fixing your Permalinks
- Log into your WordPress Dashboard, using the username and password from the copy of WordPress you brought over
- Under Settings, click Permalinks
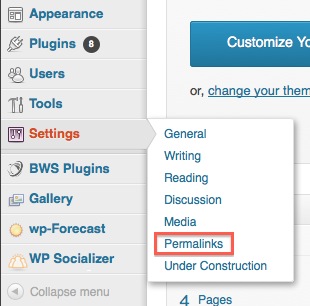
- You don't have to make any actual changes, just click the Save Changes button.
Doing this will update all the page and post URLs. If you have custom themes or plugins/widgets with old URLs, you will have to update those manually since there are not any plugins that are able to modify those as well.
View your Site
Once you have completed these steps, view your site in your browser to make sure everything looks correct and is functioning properly.
 446,079 views
 bookmark
 share
share
 tags: export import migrate wordpress


 E-mail
 Twitter
 Google Bookmarks
 Facebook
 MySpace
 Digg
Digg Reddit
 Delicious
 LinkedIn
 StumbleUpon